This page covers:
- What's a Workspace?
- Where to find Workspaces
- Adding people to a workspace
- Workspace people permissions
- Workspaces and filtering the Project List page
- Workspace tags and how they work
How-To Video: Organizations and Workspaces

What's a "Workspace"?
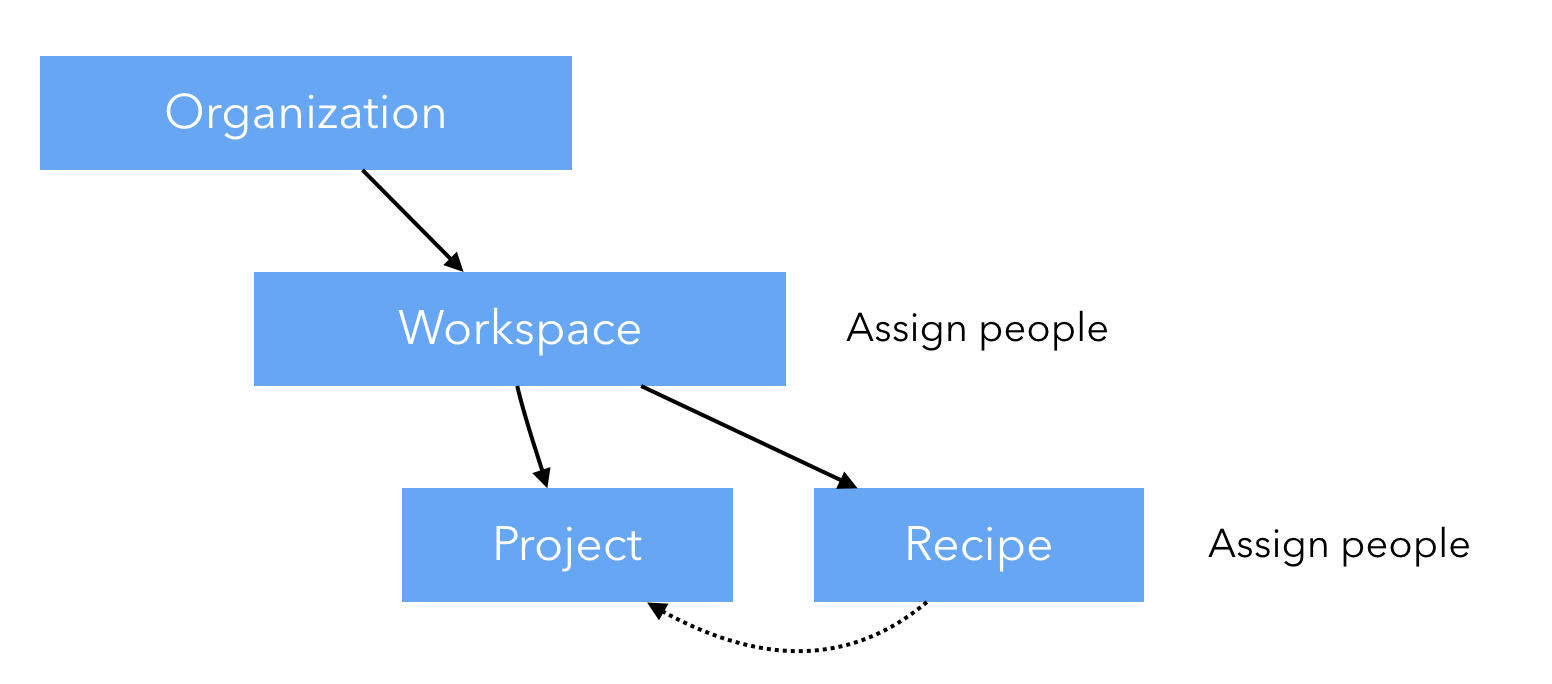
A workspace lives under an organization. Projects and recipes live under a Workspace. Projects can be created from scratch or created from a recipe.
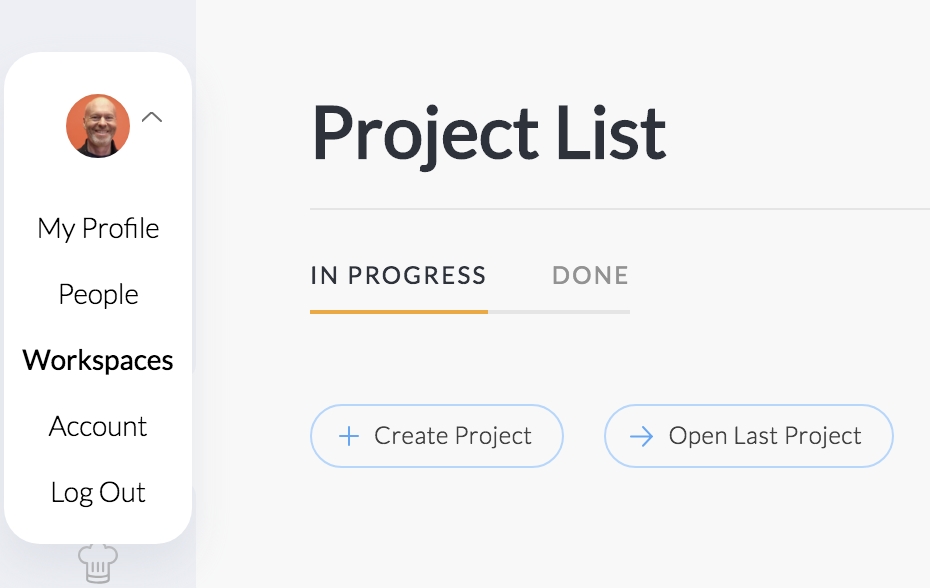
When you sign up, you get two workspaces with your account under your organization name. You will find it in the Settings/Workspaces page. Click your avatar in the upper left corner and select Workspaces.
If you were invited by someone else, you might also see their workspace in your account.
It's best to rename your two organization and two workspaces so they are meaningful. When the account was created, they are named using your first name by default. Your Free Plan or premium 30-day trial period is limited to two workspaces. If you need more, click here to learn how to upgrade to a premium plan.
A "Workspace" is a business unit structure where you would place your projects. For example, you could have one workspace for your personal life and call it "Personal" and the other one for "Business" projects. Another example, is you could have a workspace for different business departments, such as "Marketing", "New Product Development", "IT", and "HR". You could have workspaces for different products you sell, such as "iPhone" and "Watches". Or if you're a consultancy, you could have workspaces for services or different practices, such as "Healthcare Consulting" and "Transformation Consulting".
Where to find Workspaces and how to create them
- Click your avatar in the upper left and select "Workspaces". This will open the Workspaces page in Settings.

- From there you can create a new organization and when you do, click the Create Workspace button under the new organization.
- To create a workspace under an existing organization, click the organization bar to expand it and click the Create Workspace button. You can create up to two workspaces under an organization on the Free plan. You can create unlimited workspaces under a premium plan organization. When you create a project, you will assign it to a workspace and then you can filter your project list to show all projects under a workspace.
- You can create up to three Free workspaces. If you need more, upgrade to an organization and create workspaces under an organization. Click Account in Settings and create click the create organization button and follow the steps.
NOTE: Only the Organization Admin permission person can create workspaces under an organization.
Adding people to a workspace
In addition of grouping projects, you can add people and manage their workspace permissions separately in each workspace. For example, a team member could have the full powerful Admin permissions where they can add/remove other people, edit the workspace, and have full power in all projects under the workspace. This same team member could then have very limited permissions in a second workspace, such as only have the ability to create new projects, but no access to unassigned projects.
Workspace people permissions
Anyone added to a workspace will have a minimal permission to see the workspace and remove themselves if they want. They will only see the projects under that workspace if they are assigned to that project. From there, you can assign workspace people more permissions including:
- Project Creator: Create projects under this workspace and manage those they create.
Recipe Creator: Create recipes under this workspace and manage those they create. - Executive Viewer: View all projects and recipes under this workspace with very limited abilities.
- Workspace Admin: Full permissions in this workspace. Automatically get all of the above.
Workspaces and filtering the Project List page
On the Project List page you can view your portfolio of projects and their progress by workspace. To do this, click the Filters button in the upper right and then select a workspace to filter the list of projects down to that workspace.
A note on tags. You can add keyword tags to a workspace and then in the Filters view, you can select a tag to display projects under those tagged workspaces. For example, let's say you want to see a progress report showing all projects under operations, which spans across three workspaces. You can go into a workspace in the Settings Workspaces page and add a keyword tag, such as "Operations" and assign that same tag to three workspaces. Then on your Project List page, rather than selecting a workspace, you can select the tag to show all projects under that grouping.
Workspace tags and how they work
Workspace tags are available under an organization that's on the Pro or Enterprise plan. You can create tags on a workspace that's under an organization to allow you to filter the project list page by selecting a workspace tag.
The benefit is you can assign multiple tags to the same workspace giving you the flexibility to display projects grouped by certain workspaces. This will also be helpful for analytics reporting. The same tag keyword can be shared across workspaces in an organization, but not across organizations for privacy reasons.
How to create a tag in a workspace:
- Only Workspace Admins or Organization Admins can create and edit workspace tags.
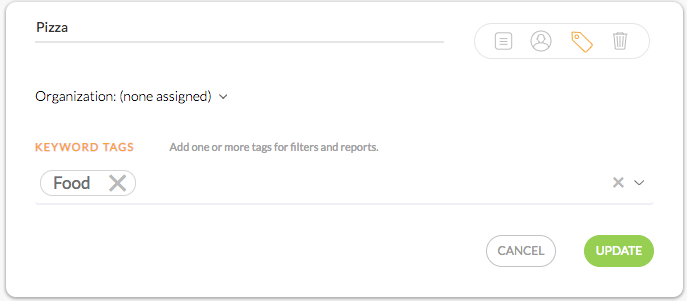
- Go the workspace and clicks its tag icon as shown in the attached screenshot below.
- You can click and enter new tags and click and select existing tags from the dropdown.
- Click Update button to submit.

How to manage workspace tags:
Let's say you no longer want to see a particular tag showing up every time you click the tag dropdown that shows existing tags to use. You can delete it from showing in that dropdown. An Organization Admin is the only one who has the permission to remove unwanted tags.
To remove a tag from a workspace's tag dropdown:
- On the Settings/Workspaces page, click the organization bar and then click the tags icon.
- Select the Workspace Tags tab.
- Find the tag you don't want and click its "X". This will not remove it from the workspaces using this tag, but rather will just remove it from the dropdown list when a workspace admin creates a new tag for their workspace.
To create a tag to show up in a workspace's tag dropdown:
- On the Settings/Workspaces page, click the organization bar and then click the tags icon.
- Select the Workspace Tags tab.
- Type in a new tag and click enter. This will make that tag available to use in your organization workspace.

Comments
0 comments
Please sign in to leave a comment.